
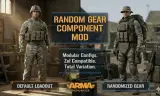
Randomzie gear easier for you soldiers when spawned.
Players now
5
Servers
10
Rating
100%
13 votes
Subscribers
-
5,387 downloads
Busiest servers running it 10 in total
All servers
 United Kingdom
1.8.0.13
United Kingdom
1.8.0.13
 Russia
1.8.0.13
Russia
1.8.0.13
 Slovakia
1.8.0.13
Slovakia
1.8.0.13
 United States
1.8.0.13
Russia
1.8.0.13
United States
1.8.0.13
United States
1.8.0.13
United Kingdom
1.8.0.13
United Kingdom
1.8.0.13
United States
1.8.0.13
United States
1.8.0.13
Russia
1.8.0.13
United States
1.8.0.13
United States
1.8.0.13
United Kingdom
1.8.0.13
United Kingdom
1.8.0.13
United States
1.8.0.13
Players on servers with it
daily, last 30 days
Details
- Author
- Dekot3LT
- Version
- 1.0.4
- Size
- 8 KB
- Licence
- APL
- Game version
- 1.6.0.119
- Likes
- 0 / 0 dislikes
- Published
- 21 Feb 2026
- Updated
- 7 months ago
- Workshop ID
- 68AAF2210A36FEF6
Recent adoption
30 days: +17 −14 ↑0
- + SabreTaskForce - Conflict PVE + Crossplay 1.0.4 1d ago
- − SabreTaskForce - Conflict PVE + Crossplay 1.0.4 6d ago
- + AU/NZ Freedom Fighters PVE 1.0.4 1w ago
- + Training Development Field Group 1.0.4 1w ago
- − Training Development Field Group 1.0.4 1w ago
- − [RU] WASD | RUSSIAN | arma-wasd.ru 1.0.4 1w ago
- + [RU] WASD | RUSSIAN | arma-wasd.ru 1.0.4 1w ago
- − TofRukOnz 1.0.4 1w ago
- + TofRukOnz 1.0.4 1w ago
- − Unité Phoenix Event 1.0.4 1w ago
- + Unité Phoenix Event 1.0.4 1w ago
- − Department of Motor Vehicles Training Center 1.0.4 2w ago
Requires
1
Required by
7


Often used with
8



Version history
5-
v1.0.4 8 KB 4 Mar 2026
Did mistake in my logic for Primary/Secondary weapons. In advanced logic was idea to make with magazines that weapon would spawn but by mistake i made that you could randomize weapon kinda attachments. So added another line for advanced section One for attachements Another for megazines/grenades/etc Should not break any current builds that are made already.
-
v1.0.3 8 KB 24 Feb 2026
-
v1.0.2 6 KB 21 Feb 2026
-
v1.0.1 5 KB 21 Feb 2026
-
v1.0.0 3 KB 21 Feb 2026
Description from the Workshop
📖 How to Use Step 1: Create a Gear Pool (.conf) Instead of putting .et files directly into the character, you create reusable configuration files. In the Enfusion Workbench Resource Browser, navigate to your mod's folder. Right-click empty space -> Create -> generic config. Search for and select SCR_GearPoolConfig. Name the file something recognizable (e.g., Pool_PMC_Jackets.conf). Open the .conf file and add your desired .et clothing prefabs to the array. Save it. Step 2: Attach the Component Open your custom Character .et prefab in the World Editor. In the Object Properties panel, click Add Component. Search for and add the RandomGearComponent. Step 3: Assign Your Pools Click on the RandomGearComponent on your character. You will see organized categories for Vanilla Slots and Zel Custom Slots. Simply drag and drop your newly created .conf files from the Resource Browser into their matching slots (e.g., drag Pool_PMC_Jackets.conf into the "Tops Config" slot). Leave any slot blank if you do not wish to randomize that body part. Step 4: Configure Your Base Loadout (Important!) For the smart ammo transfer to work perfectly, you must let the base game spawn the character normally first: Keep Default Clothes: Ensure your character has default clothes assigned in their BaseLoadoutManagerComponent. Keep Ammo Targeting: In your SCR_InventoryStorageManagerComponent -> InitialInventoryItems, set up your ammo .conf files to target the default clothes exactly as you normally would. The Magic: When the character spawns, the script waits half a second, safely extracts your assigned ammo, deletes the default clothes, equips the random clothes from your pools, and dumps the ammo back into the new pockets! Need help or more info - https://discord.com/channels/105462288051380224/1473079537725079734